The Inspiration: Aug. 24, 2011
I loved Tim Burton's remake of the "Planet of the Apes" in 2001, so when Rise of the Planet of the Apes came out this summer (2011) I was thrilled. It wasn't a Tim Burton film, but it took you on a journey. Burton doesn't rely on CGI to create amazing effects; he focuses on makeup effects, animatronics, things that are tangible. As good as CGI guys are, there is always something "off" about their creations ...where creature effects are concerned. I knew right away Caesar was CG'ed. Rather than reveal the dynamic evolution in Makeup FX technology that has occurred in the ten years since Burton's film, Wyatt falls back on CG. The makeup in Burton's film were fantastic, but what might we have seen in "Rise..."? We will never know.
That aside, the film was great. As much as it may seem like I am bashing the CG work in Wyatt's film, I am not. As an MUA and prop guy, I like to see tangible creations over digital, but I can still appreciate the amazing craftsmanship the CG artist put into the film. So much so that I was inspired to create a latex chimpanzee mask with the detail and realism portrayed in the movie. Granted latex has its limitations, more so than, say silicone, but that would be the difference between an affordable piece of art and a unattainable piece of art--roughly $200 and $700 plus. I think art should be affordable. It shouldn't hurt to own it. If I was going to make such a mask, latex would have to be my medium.
Like the werewolf mask, I spent several days looking at what others have done, reviewing countless photos of real chimpanzees, and referring back to my inspiration, "Rise of the Planet of the Apes". I wish I could post the images here, but I don't want to violate any copyrights or assume myself on another artists work. With my reference material in hand, I when to work sculpting my chimp.
The sculpture: Sept 1, 2011
I am so incredibly grateful for the internet. With all the crap it contains there is an equal amount of useful information. It wasn't long ago that one would have to hit the books to find useful reference material for a project. How many books would you have to preview to find enough material to assist you in a project like this. How may days would it have taken to find what you can locate in seconds online. WOW.
Below is a first glimpse at the sculpture. This was several hours of work, and I hadn't yet added the fine detail.

I reviewed many reference images and decided to focus on a mature male chimp for the first mask. There were several reasons for this, the first being the needs of the customer. Most of our customers are adults. Its likely that most of the people wearing our masks will be adults. While young chimps are adorable, a young chimp's head on the average adult body would look strange. The other reason for the mature chimp was the age itself. There is a lot of character that can be captured in a mature creature, particularly wisdom.
Below, I've attached a photo. I combined a profile and straight on shot while removing the background distractions. As I mentioned, fine detail has yet to be added.

Mold Day: Sept 4, 2011
You have heard me say how much I dislike mold days. There is a lot of work that goes into molding a sculpture. Cleaning the plaster bucket, cutting the plaster bandages, measuring our the Ultra Cal, the plaster dust, do you have enough white clay to create the case lines and the wall, and then there is the worry that something will go wrong and you will loose both the mold and the sculpture. Its exhausting. And after all that work and stress, you have to clean up the disaster. So yes mold days are a pain ...a royal pain, but when that mold turns out, and you get your first pull, you forget about the back breaking experience that brought you to that point. Until you have to mold your next mask.
Keeping you mold in mind, even during the sculpting process, is extremely important. Have an idea where your separations are going to be. Sometime flashing cleanup can be ugly, so you might want to hide the evidence of those lines under the hair pattern. Things to keep in mind.
First Pull: Sept 8, 2011
After three days of drying, we poured our first cast. The heat here is great for fast mold dry times. You should never rush it though. Think of all the work that went into making that mold, adding heat can crack your mold. Don't set it next to a heating duct, place it in direct sun light, or warm it in an oven. Let the water in the plaster evaporate at its own rate. Being patient sucks, but loosing you mold because you rushed it sucks more.
Below is a photo of the first pull. Again, I've removed background distractions to that you can focus on the cast itself. Here you can see the fine detail I added. I forgot to take a photo of the sculpture before I started molding it.

Paint Scheme Test: Sept 13, 2011
The paint process was a bid delayed by another project, but it gave the cast time to dry at its own pace. Again, I reviewed some reference photos, things other have done as well as actual chimpanzee photos, and decided on this paint scheme for the test. Remember, you can never recreate the scheme exactly. You are going to adjust things through the nature process of selection and even add your own flare as you go. DON'T BE DISCURAGED IF YOUR PAINT SCHEME DOESN"T LOOK EXACTLY LIKE YOUR REFERENCE. Even twins have subtle differences. You're creating your own thing here, not someone else's.

Notice the spots. Apparently these become more visible the old a chimp gets. It adds a gravity to the character. I blended a number of browns, coffee, burnt & raw umber, and a few lighter browns. The black ranges from blotchy to sold. Remember that no ones skin is on uniform color. Even patterns can have bleeds, like in a dogs coat. I am very happy with the way this turned out.
Tomorrow is hair and eyes.
Today was hair punching and generalized finishing. One of the largest expenses on a mask or prop is the hair punching. As you can see by the photo, there is a lot of hair required. Depending on the size of your hair punching needle, you can punch up to 5 strands at a time. I am sure you could do more if you wanted, but at some point you're going to start ripping up your paint job. I am a rather fast punch, and still it took me 5 hours to get the hair into the chimp's scalp and face.
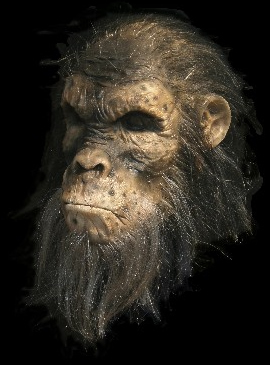
Sure, we could have glued a cheap wig onto the chimp's head, but we take a lot of pride in our creations. Sure we want to keep costs down, but not at the expense of the quality. We say film quality masks and props and we mean it.
Mixing hair is another part of the process. You have to mix in other colors. Hair isn't uniform, like skin it's blotchy and needs to have depth and compliment the character of the creature you have created. Sculpting is as important as the paint, hair and finishing is as important as paint & sculpting. If you slack on one, you'll see it in the finished product.
There is a tendency to want to race through the hair punching process. Doing so typically results in broken or bent punch needles, pops in the paint, or mispunch scratches or scraps. When you hair punch, take your time. Its boring, trust me, I know. Just put in some music, and get as comfortable as possible. When you're done, your finished project will look great and you will have forgotten (a little) what it took to get it to look perfect. OR, you could just make creatures without hair, which will save you a lot of time and preserve your sanity. :)
A short 360º video of the Ape Mask.

Photograph by Benjamin Bomba